AU
AU
 USA
USA Canada
 UK
UK EU
EU New Zealand
 Japan
Japan Singapore
 UAE
UAE India
India
You use your computer in different ways to everyone else, so it only makes sense for you to customise your mouse to your daily workflow.
Apex Control makes it easy to do just this – letting you assign any function with its own keyboard shortcut to almost any button on your Apex mouse.
Of course, any tool with that kind of flexibility can be a little bit complex to use, so that’s why we’ve put together this plain language guide that aims to give you the information you need to make the changes you want as clearly as possible.
Downloading and Installing Apex Control (Mac)
- Download the Apex Control app by clicking here.
- Double click on the downloaded file, Apex Control.dmg. A Finder window will open, with the Apex Control app and a shortcut to your Applications folder. Drag the Apex Control app into your Applications folder.
- Launch the program like others via Launchpad, or by typing “Apex Control” into Spotlight. Your Apex mouse must be connected to the computer (via USB-C, Bluetooth or 2.4GHz) for the app to function.
Downloading and Installing Apex Control (Windows)
- Download the Apex Control app (Windows) by clicking here.
- Double click on the downloaded file, Apex Control.exe and follow the instructions.
- Launch the program like others via the Start Menu, or by typing “Apex Control” into the Windows Launcher. Your Apex mouse must be connected to the computer (via USB-C, Bluetooth or 2.4GHz) for the app to function.
Reconfiguring Apex’s Buttons
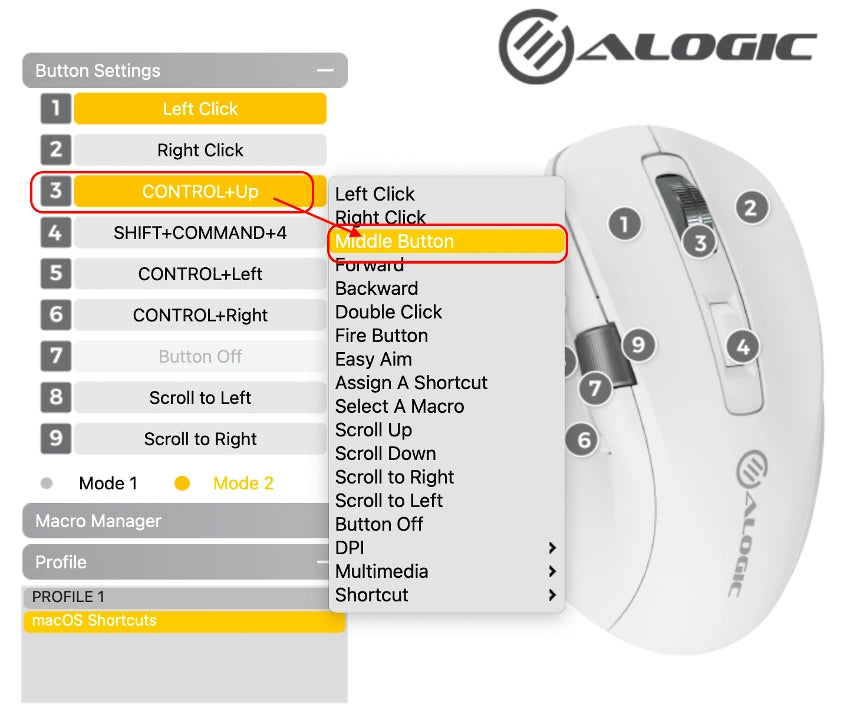
With your Apex mouse connected to your computer, open Apex Control and find the number hovering over the button your wish to reassign. Click on the corresponding function in the ‘Button Settings’ menu on the left of the app.
Warning: Be careful when reassigning Button (1) – Left Click. Without access to another mouse or trackpad, undoing this change may be difficult as Apex will no longer be able to click on things in the app.
When you open that menu, you’ll see a number of preconfigured actions you can assign to one of Apex’s buttons. The table below explains what they all do.
| Action | What It Does |
|---|---|
| Left Click | Your basic ‘click’ for selecting and activating things. |
| Right Click | Your secondary click for opening menus and other contextual actions. |
| Middle Button | This is when you click in your mouse wheel, which performs different actions in different apps, including scrolling and opening/closing tabs. |
| Forward / Backward | These functions are used differently by different apps – in web browsers they send you to the page you used to be on, while in some apps they’re used to move between tabs or functions. |
| Double Click | This makes the mouse perform two Left Clicks in quick succession, useful for opening files and applications. |
| Fire Button | This continues to Left Click for as long as you hold down the button, useful for some video games. |
| Easy Aim | This lowers Apex’s DPI (how fast the mouse moves) to its lowest setting for as long as this button is held down. Useful for fine tuning your aim in some video games. |
| Assign a Shortcut | This allows you to assign any keyboard shortcut to this button. This feature is very useful and is explained below. |
| Select a Macro | This allows you to assign a Macro you’ve prepared to this button. Macros are powerful tools for issuing multiple commands with a single click and are explained below. |
| Scroll Up/Down/Left/Right | These functions move the window a small amount in the direction indicated with every press of the button. Designed to be assigned to the side mouse wheel (8) and (9) only. |
| Button Off | This removes all function from a button, helpful if you don’t want anything to happen when you press it by accident. |
| DPI -> DPI Cycle | This switches Apex’s DPI (how fast the mouse moves) between its four presets. |
| DPI -> DPI + | This switches Apex’s DPI between its presets, but only to higher (faster) values until you reach its fastest. |
| DPI -> DPI - | This switches Apex’s DPI between its presets but only to lower (slower) values until you reach the slowest. |
| Multimedia -> Play / Pause | This key pauses playing media (Songs/Videos/Podcasts) and plays paused media. Not compatible with all apps. |
| Multimedia -> Stop | This function ‘stops’ the currently playing media, removing your ‘played’ progress through the track. |
| Multimedia -> Previous Track / Next Track | These function differently depending on the app, often switching to the previous/next song or video in a playlist, but sometimes returning you to the start of a song/video or skipping 30 seconds of a podcast. |
| Multimedia -> Volume + / Volume - | These raise or lower your computer’s ‘system’ volume. Doesn’t work with some headphones and speakers. |
| Multimedia -> Mute | This mutes your computer’s audio. |
| Shortcut -> Open | Opens a new file in your app. The same as CTRL/CMD + O. |
| Shortcut -> Save | Saves the file you’re working on. The same as CTRL/CMD + S. |
| Shortcut -> Find | Let’s your search a webpage or document for words or sentences. Same as CTRL/CMD +F. |
| Shortcut -> Undo/Redo | Undoes your most recent action, or redoes a change you’ve undone. Function varies from app to app. |
| Shortcut -> Select All | Selects everything in the currently open file. Same as CTRL/CMD +A. |
| Shortcut -> Print | Prints the currently open file. Same as CTRL/CMD + P. |
| Shortcut -> Take Screenshot (Mac) | Starts the process of taking a screenshot – after pressing the button, drag a box over the area of the screen you wish to save. The image will appear on your desktop. Same as SHIFT + CMD + 4. |
| Shortcut -> Take Screenshot (Windows) | Opens the screenshot tool. The same as SHIFT + WIN +S. |
| Shortcut -> Spotlight Search (Mac) | Opens up Spotlight, which lets you open files and apps by typing in their names. Same as CMD + Space or F4 on an Apple keyboard. |
| Shortcut -> Mission Control (Mac) | Opens Mission Control, which lets you switch between windows and desktops. The same as CTRL + Up or F3 on an Apple Keyboard. |
| Shortcut -> Switch to Left/Right Desktop | Moves between your computer’s virtual desktops. Same as CTRL/WIN + Left/Right. |
| Shortcut -> Lock Computer | Puts your computer into lock mode. |
Configuring Apex’s Scroll Wheel
To change the function of Apex’s side scroll wheel, you need to change the following keys:

(7) – Clicking in the side scroll Wheel
(8) – Scrolling to the Left
(9) – Scrolling to the Right.
Only certain functions can be found to (8) and (9), as many kinds of output don’t make sense for a scroll wheel you might trigger five times in a single scroll.
(7) represents clicking in the side scroll wheel, in the same way that (3) represents clicking in the main scroll wheel. The function of this button cannot be changed manually – its function will automatically change depending on what you’ve bound (8) and (9) to, eg. muting the system volume when the wheel is set to volume + and -.
Holding the wheel down for five seconds will switch between the scroll wheel’s “Mode 1” and “Mode 2”, which you can configure through the toggles on the screen.
Note, Mode 1 and Mode 2 only change the function of the scroll wheel, not other buttons on the mouse.
Creating Shortcuts
Shortcuts are the easiest way to make Apex do something specific in one of the programs you use everyday, like Photoshop or Excel.
To create a shortcut, click on the button you wish to reassign, and select “Assign a Shortcut”.

A box will pop up where you can specify which keyboard inputs you want the mouse to send whenever you press the button. These can consist of one letter/number key and any number of your system modifier keys (Mac: Ctrl, Opt, Cmd, Shift. Windows: Win, Ctrl, Alt, Shift.)

To assign the shortcut, click in the black bar and press the letter/number key on your keyboard, then tick any of the modifier boxes you need. Then click “OK” to confirm.
Here’s a few examples:
- To make one of Apex’s buttons open a New Tab in Google Chrome (or most other programs), the keyboard shortcut is Command or Control + T, depending on whether you’re using Windows or Mac. To assign that function in Apex Control type “T” into the black bar, and tick command on Mac or control on Windows.
- To make a button create a new layer in Photoshop (Shift + Control/Command + N), type an “N” into the black bar, then tick Shift and Control on Windows, or Shift and Command on Mac.
- To refresh all data in your Excel workbook, the Windows command is Ctrl + Alt + F5. To set this shortcut up, tick Control, Alt and hit the F5 key after clicking on the black bar to bind this to your mouse.
Creating Macros
If you’re not familiar with Macros from programs like Excel, you can think of them like super-powered shortcuts. Instead of making a single button function like a combination of keys, Macros can play a whole sequence of recorded keyboard and mouse commands every time you press the button, letting you condense a multi-step action into a single click.

Here’s a couple of examples of what you can do with Macros:
- Type a short, commonly used message with a single button, such as
“Kind Regards,
Jane Smith”
- Perform a repetitive task, such as copying a cell in Excel, selecting the cell two to its left, and pasting in that value.
- Perform a repetitive task, such as creating a new layer in Photoshop and some basic settings you use over and over again.
- Automating certain multi-step actions in a video game, such as opening your inventory and using a certain item.
Basically, any series of keyboard commands and clicks can be recorded then recalled with a single press of any of Apex’s buttons.
To create a Macro:
- Click “Macro Manager” and then enter a name for your Macro in the black bar at the top of the window that pops up.
- Then hit the + icon to make an empty Macro.
- Before you record your Macro, decide whether you need to record delay between your inputs. If you’re looking to get stuff done as quickly as possible, there’s no need to record inputs, such just select OPTION. If you’re recording a sequence where you need to wait for an app to process something, such as applying a blur filter in photoshop, you may wish to record the delay with OPTION to ensure your later commands don’t get applied before Photoshop is ready. This is also useful when making Macros for video games, as you often have to wait for animations to complete before the game will accept the next input. Additionally, some online games may interpret multiple commands being input very quickly as cheating. In these cases, it’s best to build in a delay.
- Before recording your Macro, it’s best to plan out what commands are required – once you hit record, any keyboard input will be entered into the macro.
- To record the Macro, hit the “Record” button in the top right of the window, then enter your keyboard commands.
- If you need to add mouse clicks to the command, click “Mouse” and select the type of click from the menu on the left. Then click on the mouse click in the list of recorded actions, and use the up and down arrows beneath to move those clicks into the right place in the sequence.
- If you made a mistake, you can delete individual commands with the bin button beneath the recording area. Note – the bin icon above the recording area deletes the whole Macro.
- If you made many mistakes and it would be easier to just re-record the Macro, hit the broom icon under the recording area to empty the Macro of all commands.
- With the Import and Export buttons, you can send individual Macros to your friends or coworkers.
- To assign a completed Macro to one of Apex’s buttons, choose ‘Select a Macro’ from the button assignment menu, then select the name of your Macro. If the software shows the key as being assigned to ‘Macro-‘, that means you didn’t correct select the name of your Macro. It should show ‘Macro-MACRONAME’.
- The sequence of commands you set up should now be triggered on every press of the button you assigned.
Changing Apex’s On-Screen Speed (DPI)

By adjusting Apex’s Dots Per Inch (DPI) value, you can change how fast the mouse cursor moves across your screen. A lower DPI value results in slower but more accurate mouse movement than higher speeds.
Apex can save four DPI speed presets between 400-6400 DPI, which you can toggle between using the ‘DPI Cycle’ function, bound by default to Apex’s button (4), just below the scroll wheel.
You can change the value of these presets by dragging the bar up and down on the right.
The ability to switch DPIs is most useful for playing video games, where a person might want very fast movement (high DPI) to look around, then a low DPI setting to accurately aim at a target.
If you only want your mouse to move at one predictable speed, we recommend finding your ideal speed and then rebinding button (4), so you can’t accidentally press it and find your mouse moving at a totally different speed.
For general use, most people find a DPI setting between 1,000 and 2,000 most comfortable.
Changing Apex’s Lighting

In the lighting section of Apex Control, you can change the pattern and intensity the LED lights at the front of the mouse.
“Breathing” slowly increases and decreases the brightness.
Note that the power slider underneath the mouse must be in the top position for the light to function.
Changing Apex’s Polling Rate

In this section, you can change Apex’s polling rate – the frequency with which it tells the computer where it is.
Higher polling rates can increase the speed and accuracy of the mouse’s on screen movement, primarily of interest when playing video games.
However, higher polling rates will drain the mouse’s battery faster.
Polling rates above 125Hz are not available when using Bluetooth.
If you have any questions about your Apex mouse, please feel free to get in touch at support@alogic.co